Pages

Showing posts with label Tutorial. Show all posts

Saturday, August 18, 2012

Shine Bright, Shine Far.


Sorry this post is so late! I have been really busy this weekend with working and trying to get everything ready for school on Monday! I didn't even have time to paint my nails, which was strange for me. With school coming on Monday I decided to go for a nail look that was flashy and would make me feel motivated. I love this look because it is fun and colorful, and the stars on the thumb and ring finger make it more interesting. This whole nail design was done using only nail art pens also, which makes the design easier to control.


PRODUCTS I USED:
( In Order of Picture )
  • Kiss Nail Art Pen in Pink
  • Kiss Nail Art Pen in Silver
  • Kiss Nail Art Pen in Black

HOW TO:

  1. First, what you want to do is paint your nails all over with a shiny top coat. This will give us the base for this look. I say a "shiny" top coat because I believe because your not painting the nail all over with a color then you should have a nice shine on the parts of the nail that is not colored.
  2. After you have waited for the shine to dry you want to paint half of your nail with the pink nail art brush. Start from the bottom of your nail and draw a diagonal line up to the tip of your nail. Color in one side of the diagonal line creating a solid triangle on one half of your nail. I recommend doing the diagonal lines on one side of your hand one way and the other hand the opposite.
  3. Next you are going to want to do the stars, I chose to do them on my thumb and ring finger, but you can change that. I also decided to do my stars fairly big, so that I could choose to have some part of the star not on the nail. To do the star I looked up a picture of a star online, this made it easier for me to draw it on my nail because I just followed the lines. I did my stars in the silver nail art brush.
  4. Next while you wait for the stars to dry you want to take another nail art brush color and on the nails that you didn't paint the stars paint a black stipe just on the edge of the pink triangle. Then do the same with the silver nail art brush next to the black stripe. 
  5. After the stars have dried you want to take the black nail art brush and outline the stars. This just makes the stars pop against the rest of the nail.
  6. Once you are completely dry you want to take your shiny top coat that you used as your base and paint two coats of this on your nails.

I hope you enjoyed this tutorial. I cannot wait to start school Monday! That is also when I will do my first blog on the "Empire Beauty School" series! Where I will try to remember to blog every day my experience at school. I hope that a lot of you will find this interesting if you wanted to know what it was like to go to beauty school or if you are thinking about Beauty School! As usual I would love to see you try this look or I would also love some comments.

xoxo Emma

Wednesday, August 15, 2012

Dinner Dance Hair Tutorial


Well, I haven't done a blog post about any kind of hair styling yet, so I thought it was about time to do one. This hair style was done on my little sister for her Eighth Grade Dinner Dance. This style is actually really easy to do and looks very neat. I love it on long hair, but it can also very easily be done on short hair also. Let's Get Started!

WHAT YOU WILL NEED:
  • Bobby Pins 
  • Little Hair Elastics
  • Hair Spray
  • A Pretty Flower Clip, if you wish.

HOW TO:
  1. First what you want to do is brush the hair and make sure that it is rid of all knots or kinks. 
  2. Next you want to take some hair from above the ear and start to braid that, I would make it a little thick but not too thick. Once you have braided all the way down to the bottom of the hair, you will need to secure that with one of your hair elastics.
  3. Repeat step two on the other side of the head.
  4. Once you have your two braids bring one around the back of the head and secure it with bobby pins onto the opposite side of the head from where you started the braid just above the ear.
  5. Repeat step four with the other braid.
  6. Once you have completed these steps you should have the same look above. If the two braids aren't staying together like you want them to then you can take some more of your bobby pins and attach the braids together by threading the bobby pins through one braid and then to the other.
  7. Once you have finished with the braids you can leave the hair straight or you can curl the ends, I curled the ends of my sister's hair for this look.

Now if you don't like the way it looks just plain or there are too many bobby pins showing on one side then you can take a hair decoration and just attach it to the start of the braids, like I did in the picture above. I think that if you are going out somewhere to a dance or out for dinner then the extra decoration makes the style a little classier. If you are just going to the beach or for a walk downtown then I suggest not adding any decorations for a more casual look. I hope that you enjoyed the first of my hair tutorials and there will be more to come!

xoxo Emma.


A Twist to Cheetah Print Nails


I have decided to try something different for this post, I have created a youtube channel where I will also post all of my tutorials on my nails and hair. I thought that this would be an easier way to show you all how to create the tutorial. I will still be doing step by step instructions but for people who would rather see a visual to do the steps I will put the video onto the blog post also! 


Today's nail tutorial will be a twist to the regular Cheetah Print nails! I decided that since the Cheetah Print nail trend is going up in popularity then I wanted to create a look that is different from the regular. This tutorial is actually easy and you will be surprised at how easy it is for you to create! 


PRODUCTS USED:
( In Order of The Picture )
  • Revlon Clear Coat in 771 Clear
  • Circus by Andrea's Choice in Ringmaster
  • Kiss nail art Paint in Black
  • Kiss nail art Paint in Silver
  • Circus by Andrea's Choice in Reverso
  • A paintbrush
  • A scrap piece of paper

HOW  TO:
  1. First, as usual you will want to put on your base coat which makes the nails less breakable!
  2. For your first step you want to paint your nails completely with your pink color. With the first coat you will notice that it is a little streaky, to prevent this all you need to do is just paint another coat of the pink. You can paint as many coats as you want till you achieve the perfect color.
  3. Next you want to create a diagonal stripe across your nail from the bottom of your nail to the top of your nail. On one side of the line you want to fill in half of your nail with the silver nail art brush. I also recommend that you do two coats of the silver because you don't want to be able to see the pink background color through the silver.
  4. After you have the silver you want to start to paint the white cheetah spots. Take your scrap paper and your white nail polish and also your paintbrush. Put a dollop of the white paint onto your scrap piece of paper. Then dip the end of your paint brush into the white nail polish and start to create the cheetah spots on the silver background. If you don't know what cheetah spots look like then you can look up a picture online. You don't want to create a full circle but you want to make uneven spots.
  5. With the white spots you don't want to do too many because you need space to put black little spots in the spaces.
  6. Next you need to take the black nail art brush and create half moon shapes around the white spots. This will make the cheetah kind of look on your nails. You can do any shape you want and any thickness that you would like to use. Don't make a full circle around the white spot, you need to leave a little space.
  7. Finally create little half moon black shapes in the silver background on the spaces between the cheetah spots.
  8. As usual the last step is to wait for the nails to completely dry and then put your top coat on.

I hope that you enjoyed this tutorial and that you try to recreate it on your own! I also really hope that the video helped you to follow along with the tutorial and made it a little easier for you to recreate the look on your own!

xoxo Emma.


Tuesday, August 14, 2012

Not Your Average Water Marbling


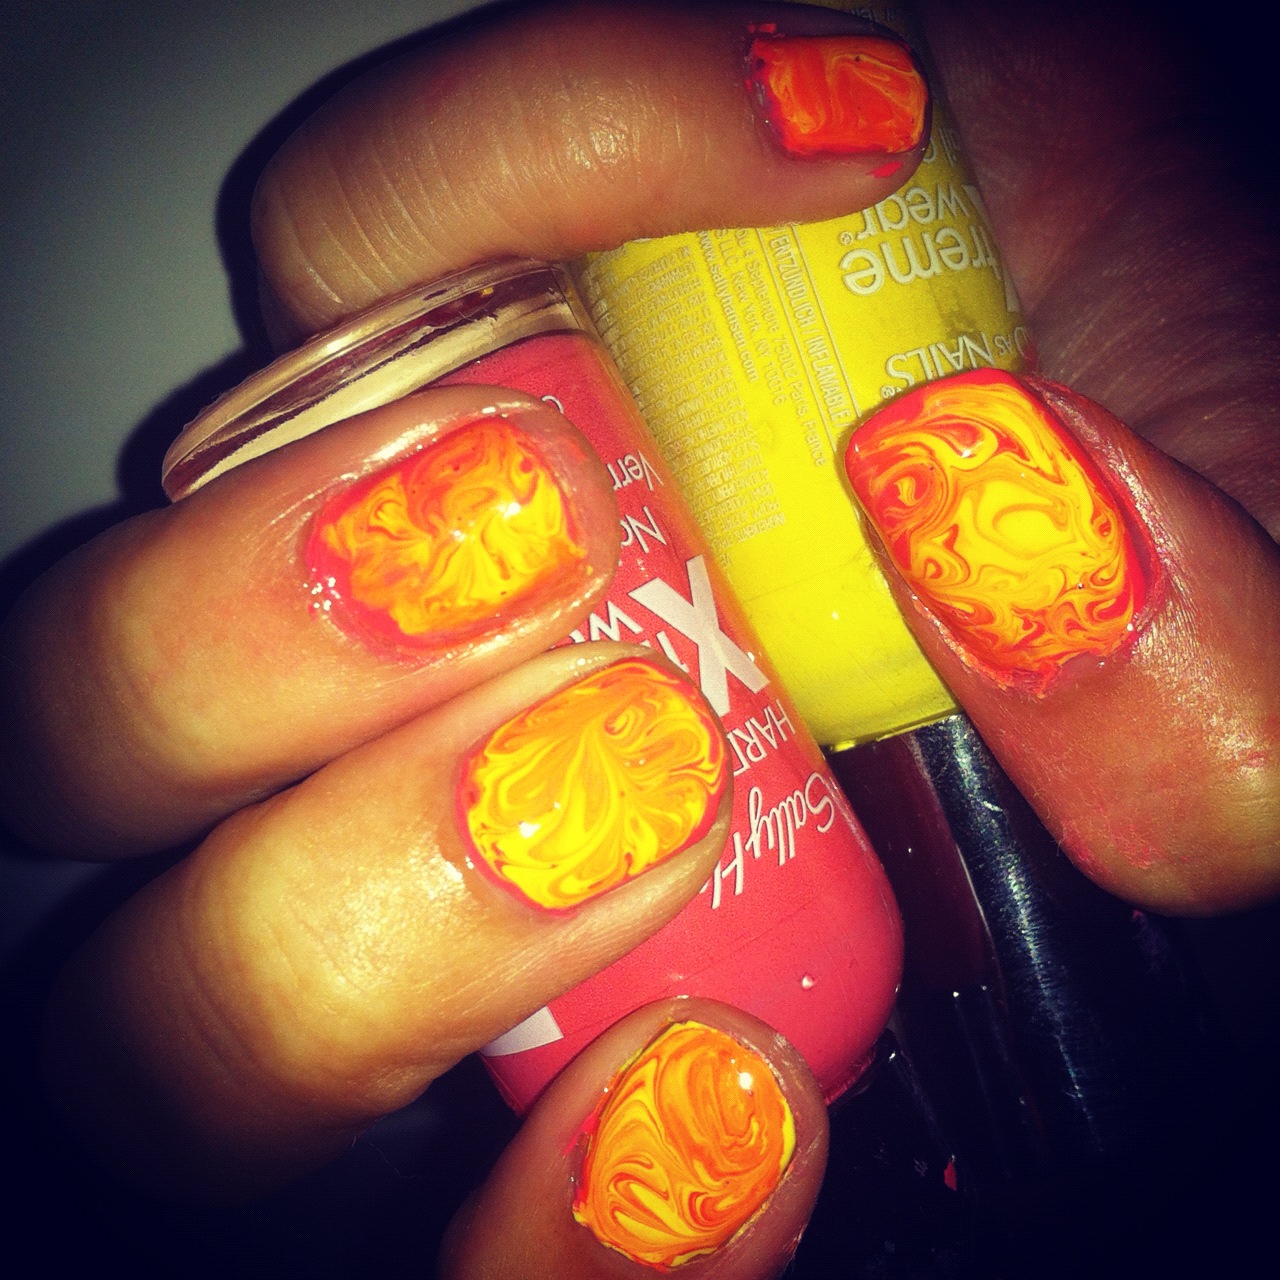
This look is an interesting one! When you look close to the nails you may think that this was done with regular water marbling, which takes about two hours if you want them to come out looking good! I recently discovered a much easier and new way to create the water marbled look without all the mess, the time, and all the wasted tape. All you will need are two, or more, of your favorite nail polish combinations and a tooth pick! If you want to know more about this design and how to do it then read on. It shouldn't take you more than fifteen minutes!


THE PRODUCTS:
( In Order of Picture )
  • Sally Hansons "150 Sun Kissed"
  • Sally Hansons "360 Mellow Yellow"
  • You will also need tooth picks, I suggest getting a bowl of them to keep by your side in case you need another one because of a mistake.

As I said previously you do not have to use these colors and you certainly do not have to limit yourself to just two colors! I wanted to test this look to see if it would work first so I just wanted to use two colors in case it didn't come out the way I wanted it to.


HOW TO:
  1. First, as always, you want to start out by using your base coat to make sure that your nails don't get damaged by the polish. It is very important for this look that you make sure the base coat is completely dry before you start to paint on the nails.
  2. Now usually when painting nails you don't want to use too much polish on each nail, but for this look we are actually going to use more polish than usual. Also for this look you will have to do each nail at a time because you don't want the polish to dry.
  3. I took my color "Sun Kissed" and painted my whole nail, make sure to use a lot of nail polish so that you have kind of a puddle like effect on your nail compared to the regular smooth coat.
  4. Then take your next color and drop a few blobs of that color in different places on the nail. This may sound strange, but trust me, it works! 
  5. Immediately after you create the blobs take your tooth pick and swirl the two colors together, make sure not to press down too hard on the nail but just hard enough so that the two colors can combine. You can swirl the colors any way you want to create different patterns.
  6. Finally, as always, after the nails are COMPLETELY dry take your top coat and paint over your gorgeous nails to give them a pretty shiny finish.

Thank you again for reading about this nail design! I hope that everyone liked it and I hope that it gave an easier way to do water marbling. I know when I saw the water marbling trend come up I thought "How do people do that?!" I will do another blog post on how to regularly water marble sometime soon so you can see how much easier this is compared to the other one. I would love to hear some feedback if any of you decide to try this look! 

xoxo Emma


The Wonderful World Of Disney....


For my first "nail post" I will show you the nails that I created for my recent trip to Disney that I just went on with my family. I look for any excuse to do a cool new nail design so I couldn't think of anything better than being able to do my nails with cute little character faces and the "Disney 'D' logo". These designs are for people with a little more experience with nail art, it is hard to accomplish... but certainly not impossible! With a little practice, and the right tools, you can create this look.


PRODUCTS USED:
( In Order of Picture )
  • Circus By Andrea's Choice in the color "Reverso"
  • Sinful Colors Nail Art in Red
  • Kiss Nail Art Paint in a Baby Blue
  • Sinful Colors Nail Art in a Bright Green
  • Kiss Nail Art Paint in Black
  • OPI Nail Lacquer in the color "The 'it' Color"
  • Revlon Top Coat in "711 Clear"


HOW TO:

  1. What you want to do first is paint your nails with a base coat, which will support your nails and make them less brittle when you take the nail polish off. Let that dry fully before you continue on to the other steps.
  2. Then take your white color, the product I used is listed above, this color is going to be the background for your character. Paint all nails with this color and then let them dry. You may want to paint a second or third coat of the white color depending on how white your white really is.
  3. Next you want to take the black nail art brush and do an outline of the characters on each nails. As you can see in the picture I put Goofy on the thumb, then Micky, Minnie, Donald, and finally the Disney Logo. I find it easier to put Goofy on the thumb because his hat makes him take up more space on the nail than the other characters. To make doing the character outlines easier look up a picture of each character online and follow their shape.
  4. You want to add the eyes of the characters and if you wish add a little bit of their noses or any other little characteristics that you want to add to your developing characters.
  5. Let the characters completely dry before you start to add their decorations (hats, bows, beaks, ect.) Micky is the easiest character to create because he doesn't have any accessories that you need to add. For Goofy's hat you just need to basically create a rectangle shape and then add a little bit of curve towards the top of his hat. For Donald's hat it is just a shape getting larger towards the top. Finally, Minnie's bow is just a regular bow, if you don't know how to draw bows then practice a few on paper before you go onto the nail.
  6. The Disney "D" is really simple. If you look up the logo online and then follow that outline on the nail you are sure to get it perfect! It is really just a "D" with a little twist at the end and a line through it.
  7. Finally, wait for the nails to completely dry then finish with your choice of top coat to make those nails sparkle!

Now you should have a completed set of nails! If anyone tries this look I would love to see them! Or if you want to comment and tell me how it turned out or if you have any questions I would love to know. Once again, thanks for reading!

xoxo Emma.